MS-06F ZAKUII

Lost in Malaysia 凸(`д´)

Ma.K 1/20 SAFS MKIII A8R8

Nitto SAFS conversion

1/60 PG Astray Gundam Blue Frame Second Revise

Scratch build conversion in progress

2012 Gundam Builder World Cup

19 ~25 November 2012 @ Sungai Wang Plaza , Kuala Lumpur , Malaysia.

Wednesday, January 18, 2012

PLAY PLAPLATE : CURVATURE PROFILE

This is not a chicken wing ! ^^
Always a setback when come to SB a curvature profile on Gunpla , thinking of how to ensure the parts accuracy when mirrored left-right or front-rear, especially a 3D curvature profile.
So as for myself , pre-shape plaplate template as foundation still the best way for this matter.

Some examples of curvature profile scratch building from 1/48 Sinanju head Display .

A set of cut out 1mm plaplate . The small center piece will be the template /foundation of a protrude curvy profile.


 Adding a pre-shape rib as guide for epoxy putty shaping and sanding .


Initial shape done.


For 2D round profile, measure the desire size and with the elastic characteristic of Polystyrene,  just bend with hand to soften the plaplate and try to Over do the U bend , yes Over do . It's much easy to push it out later than outer force to hold it in position. 


Have another plaplate with desired dimension & shape draw on it , as a guide for accuracy. Glued.


Same technique applied to another 2 pieces of U-bend plaplate on top of the first one.
Again , Putty added if it have to be a 3D curvature profile.  


Again a pre-cut thunder shape plaplate as foundation then sculpt on epoxy putty .
I will put extra 2~3mm thickness epoxy to the designed profile , so the following process i will only need to scrap off the extra but need no more topping.


Sculpting.
Trimming should be done while the epoxy putty are half harden ( after 1~2 hours curing, depend on how much water you add on when mixing the epoxy putty) As it's strong enough to hold the shape and stay in place , but also soft enough to slice with cutter.


Sanding with file only can be done after it's totally harden (after 4~5hrs)


As usual, sanding with 400 sanding sponge on curvy profile , flat & sharp edges will need sand paper/sanding stick.


Basically ,  DONE :D

Thanks!

Saturday, January 14, 2012

WIP 1 :: 1/48 Sinanju Head Display


First build of 2012.
This will my second attempt to work on Sinanju since a MG Sazabi converted Sinanju by scratch build back in 2008. The 1/100 Sinanju was the first back to scale modelling built after my 10years absent , hence there was so much flaw and inaccuracy. 
So it's like my second chance to make things right from previous mistake , but in 1/48 scale :P
It wouldn't be a full body scratch build but a bust with shoulder & down the waist line.
Yes it will be a Formania Sinanju  Wannabe to put in line with Formania Sazabi and Nu Gundam ,  although i didnt own either one  =..= 
  
Many thanks to Rayloke 's awesome idea and also provide me the tool - a light sensor with motorized CCTV dummy set.  
The idea is shaking head " No No Sinanju " !! :D 
Here's the working sample on day one .
Thanks again, Ray !! ^^

Ok , enough talking non sense and here's the progress of past 2 weeks.

Re-build the chest armor
Was plan to cut off the ori chest plate and move it forward , but seem not that appropriate in term of size.


Torso plaplate-ing 
Very much refering to MG Sinanju


Comparison with 1/100 MG Sinanju 


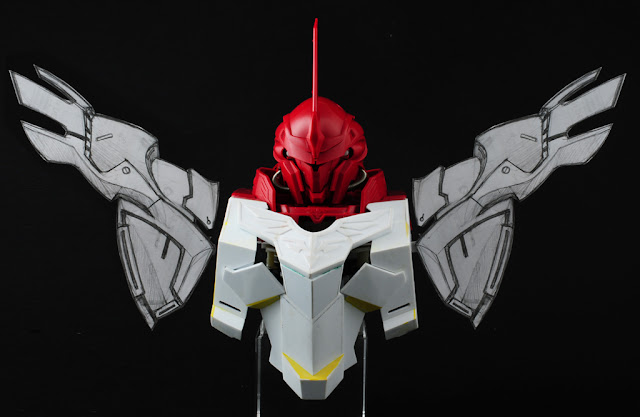
Shoulder Armor
Hand sketch design which is slightly different from the ori curvy & rounded profile  , to one with some sharp edges & straight line profile to match chest armor 's.


Making of this Shoulder armor will be shared in  PLAY PLAPLATE later.

Waist Pipe


Test fit and it seem smaller than expected -_-||| Will try highlight with bright color .


That's all for now , thanks for viewing !!

Tuesday, January 10, 2012

WAR HAMMER : HIGH ELVES

 My very 1st miniature painting in life :)

Related Posts Plugin for WordPress, Blogger...